What’s changing in the default behavior of Azure virtual networks outbound connectivity, and how to prepare
Introduction
When Microsoft Azure was in its infancy, it was not uncommon to find Virtual Machine deployments with all sorts of networking no-nos: public IP addresses assigned to every VM, open RDP and SSH ports, and poorly planned Virtual Network address spaces. With initiatives like Azure Advisor and the Azure Well-Architected Framework, we’ve since been able to correct most of these issues with practices like proper load balancing, JIT access or Azure Bastion, and hub-and-spoke topologies managed by Azure Virtual Network Manager, respectively.
With the retirement of default outbound access coming in just over a month’s time (September 30, 2025), Microsoft is taking the next step forward in its Secure Future Initiative and nudging all new customer deployments a step closer towards security by default.
In this post, we will learn more about what’s changing, and how you can ensure your upcoming Azure deployments conform to these new requirements.
What is Default Outbound Access?
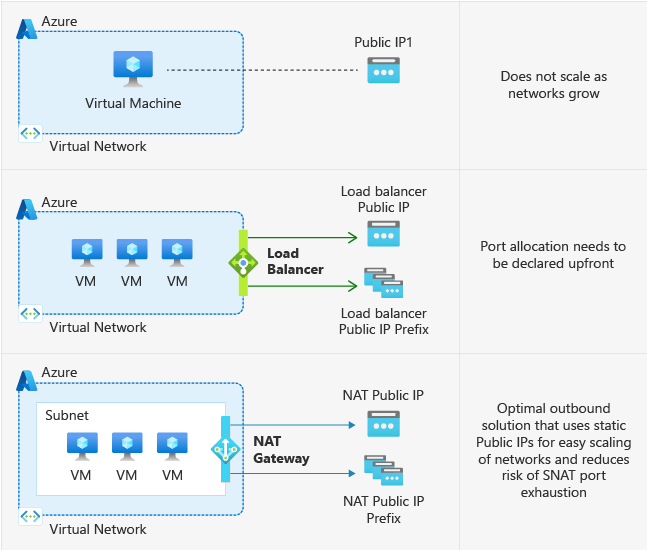
Previously, virtual machines in a virtual network without a defined explicit outbound method (in this case, no Public IP mapped to the VM or Load Balancing solution in place) would be automatically assigned a random public IP address for internet connectivity. This meant that your VMs could stay hidden and protected from incoming network requests, but could still access websites or perform apt-get upgrade to download and install software updates.
This default behavior seems sufficient in practice (after all, you’re more worried about filtering incoming traffic than outgoing requests), but it has some drawbacks, namely:
-
Security: Allowing any VM to have internet connectivity contradicts the Zero Trust principle of Least Privilege Access.
-
Predictability: As the default outbound IP is assigned by Azure and not controlled by the customer, it can lead to unexpected behavior, like an address coincidentally matching a range of IPs blocked by your Azure Firewall.
-
Manageability: It can be difficult to troubleshoot these changing IP addresses when monitoring network logs during troubleshooting.
So what’s changing?
After September 30, 2025, the new default for Azure virtual networks will not use this platform-assigned outbound IP method; instead, users will now need to configure explicit outbound connectivity methods so their VMs can access the internet.
That said, any existing virtual networks that use default outbound access will retain this behavior; however, with a more secure default taking its place, now would be a good time to review active deployments and their feasibility to adopt the new standard.
While there are a few approaches you can take to configure explicit access, we will focus on one approach that uses two Azure features: Private Subnets and Azure NAT Gateway.
Azure Private Subnets
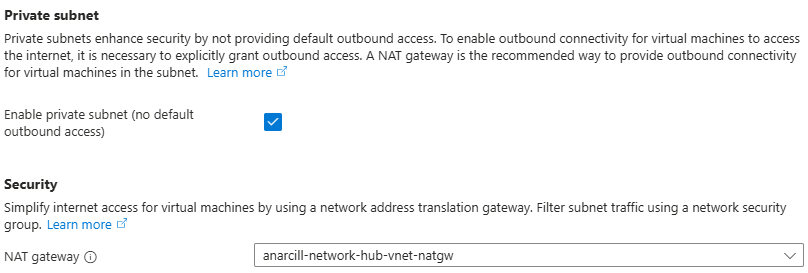
A Private Subnet is a subnet within an Azure Virtual Network that does not have a direct route to the internet. This feature entered general availability in May 2025, giving users a control to significantly reduce VM exposure to external threats.
After September 30, private subnets will be the default setting for new subnets. Now that private subnets are GA, you can activate it in existing subnets to simulate the impact to your workloads and predict future behavior.
Azure NAT Gateway
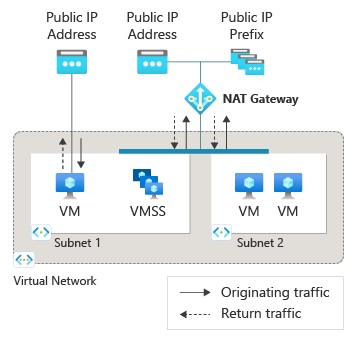
Azure NAT Gateway is a managed service that provides secure, scalable outbound internet connectivity for VMs in private subnets.
NAT stands for “Network Address Translation”, a process where the private IP addresses of your many VMs get translated into a single public address, which external internet services will see. This enables VMs to initiate outbound connections using a static public IP or IP prefix, without exposing them to unsolicited inbound traffic.
The benefits of using a NAT Gateway include:
-
Scalability: You don’t need to manage and budget for dozens of public IP addresses for your VMs; a single IP for the NAT Gateway is all you need to get started.
-
Security: Combined with private subnets, you can now be selective about which parts of your network require internet access
-
Simplicity: NAT Gateway is easy to deploy and manage, reducing operational overhead
Configuring NAT Gateway for a Private Subnet: Basic Steps
- Create a NAT Gateway: In the Azure portal, select “Create a resource” > “Networking” > “NAT Gateway.”
- Assign a Public IP or Prefix: Choose an existing public IP or create a new one for outbound traffic.
- Associate with Subnet: Link the NAT Gateway to your private subnet within the Virtual Network.
- Update Network Security Groups (NSGs): Ensure NSGs allow intended outbound traffic, while blocking unnecessary flows.
Best Practices for Secure NAT Gateway Configuration
- Restrict Outbound Rules: Limit outbound destinations to only what’s necessary for your workloads.
- Monitor Utilization: Regularly review NAT Gateway metrics to ensure capacity and performance.
- Implement Logging: Enable diagnostic logs for visibility into outbound traffic patterns and potential issues.
- Combine with Firewalls: For advanced scenarios, use Azure Firewall in conjunction with NAT Gateway for granular control and inspection.
Conclusion
Platform changes to foundational services like Azure compute and networking can be a challenge to stay on top of and a hassle to prepare. I hope this guide was a timely and useful reminder to ensuring your existing and upcoming deployments remain functional and secure by design.
Learn More:
- Read the announcement of Default outbound access retirement in Azure Updates
- Official Microsoft documentation detailing additional methods of explicit outbound connectivity
- For more advanced network scenarios, like hub-and-spoke topologies, check out this tutorial on configuring an NVA and NAT gateway
Thanks for reading, and Happy Building!